Kraft Paper Anyone?

The best memories are made around the house. — Unkown

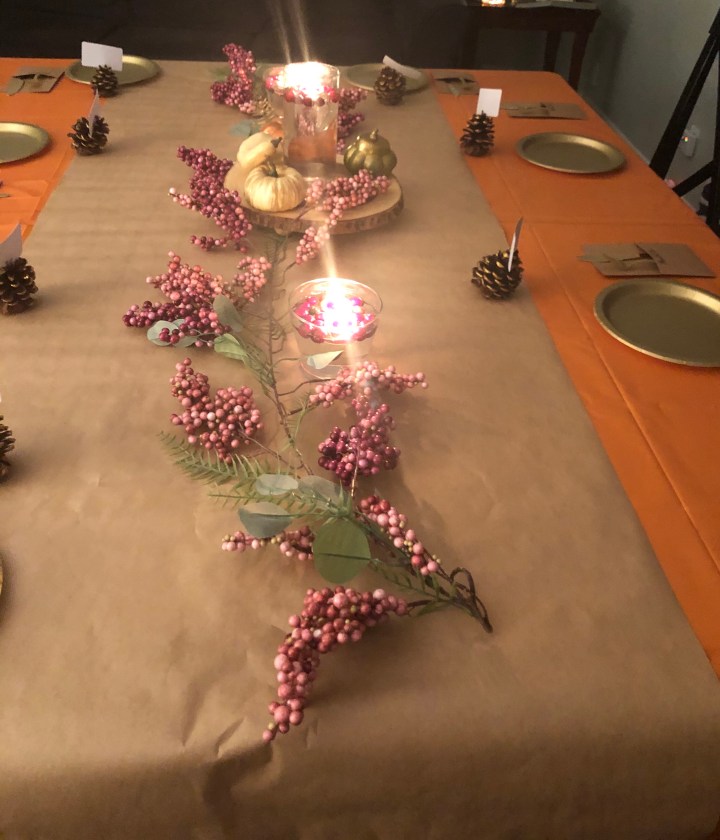
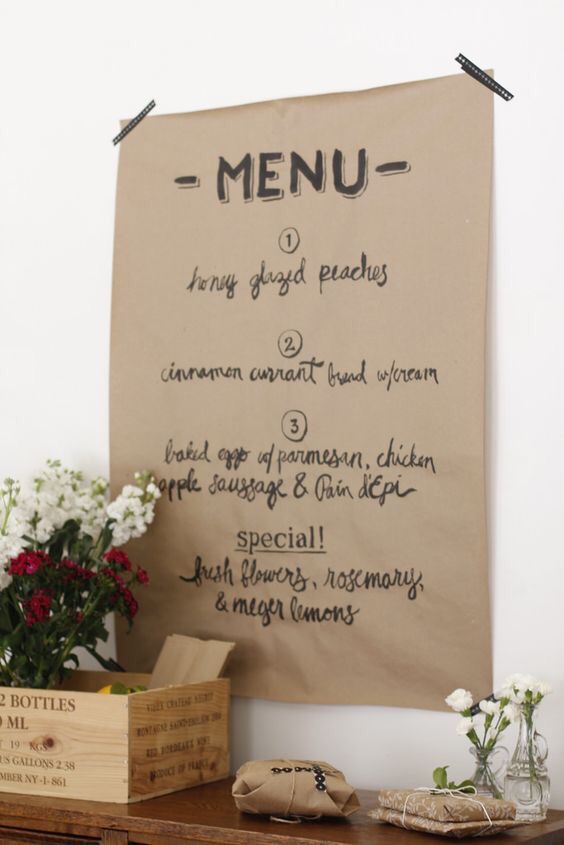
I’ve recently fell in love with using kraft paper! At first thought, kraft paper can be a very underwhelming item. I thought plain and boring but you can add so much of your personality when using it. There are endless possibilities and it’s super affordable. It’s a must add to your holiday shopping list.

As many of my friends and family know once I fall in love with something I can over indulge in it. I’m in love with black and leather for this fall season, so I have been wearing a combination of those more days than not this season. Kraft paper will fall victim to my over indulgence as well. I’m going to use it at Thanksgiving, Christmas, and anything in between that I make up. Below are a few ways that I’ve used kraft paper so far!

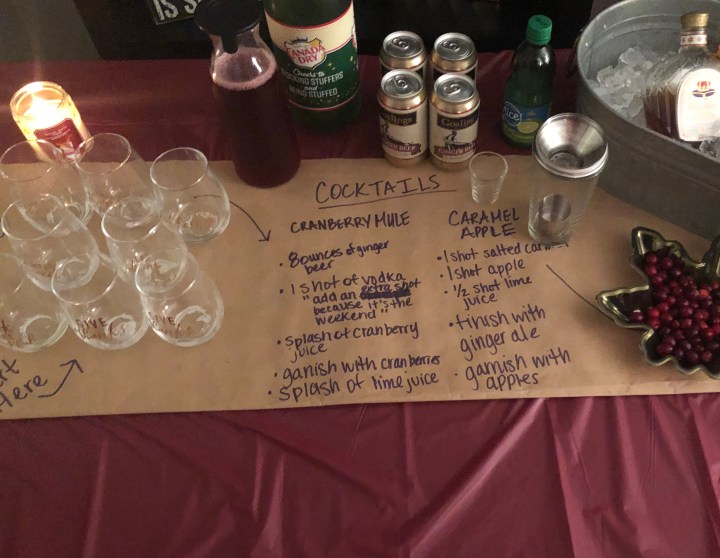
No one really wants to be the party bartender all night, so have your guest make their own drinks with signature cocktails!

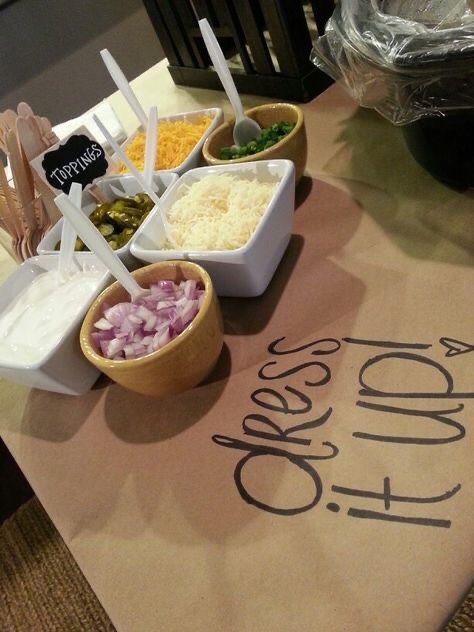
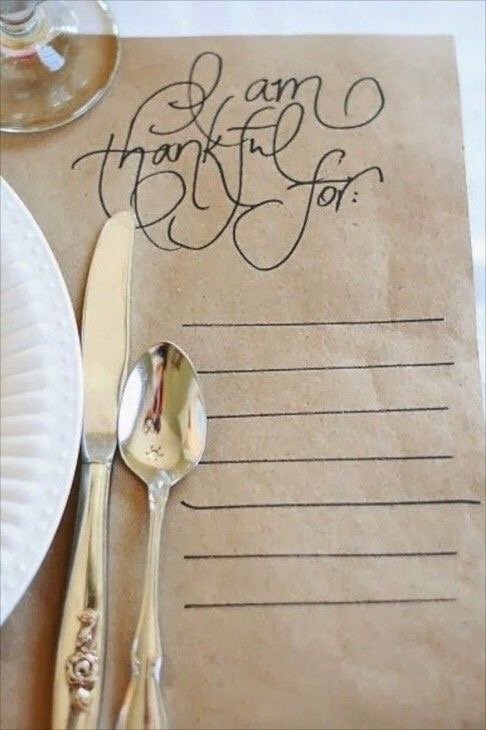
Use kraft paper for your upcoming Thanksgiving or Friendsgiving dinners to add your own personal charm to your table settings. It can take those disposable tablecloths up a notch.

Kraft paper is a great addition to kid’s table to give it some added fun during dinner. Draw pre-made Tic-Tac-Toe boards, simple word searches, or a simple outline of a turkey to keep your little ones occupied! Or simply have crayons available and let the kid’s create their own artwork.

Pinterest Inspirations!

Charcuterie board coming soon!

Oh Christmas Tree, Oh Christmas Tree!

Oh Christmas Tree, Oh Christmas Tree!

It’s the most wonderful time of the year! — Unknown

Christmas is my favorite holiday! I absolutely LOVE everything about the season. From the decorations to the little extra joy that people seem to have during this time of year. Since it’s my favorite season I love to decorate and add little touches in every room of my house. If it wasn’t for my little sister shaming me, I would put up my Christmas decorations on Halloween night. Here’s an affordable decoration that can be used as table top decor, a mantle addition, or an adornment on your stairs.

Things You Need:

  • Christmas Tree
  • Ornaments
  • Spray Paint
  • Clear flower holder
  • Ribbon
  • LED Lights
  • Wire Cutters
  • Scissors
  • Garland (optional)

I used extra spray paint from previous projects to paint the flower vases. Two coats should be enough to cover each vase. Make sure that the vases have dried completely before you begin to decorate.

Fluff out the branches of the Christmas tree and place the tree in the the flower vase. I didn’t use the stand because the tree was stable enough without it. However, if you need more stability use a Styrofoam ball in the flower vase before inserting the tree.

After fluffing the branches, I was not satisfied with the overall look of the tree because of how sparse it was. It reminded me of Charlie Brown’s Christmas tree… just sad. I went back and wrapped garland between the branches. I used what I had leftover from my Christmas decorations. Be sure to add garland to your shopping list if you want a fuller tree.

Use wire cutters to snip your decorations to a more manageable length.

Decorate your tree and then take a step back to enjoy what you created!

Frugal Fran Tip: Save your extra ornaments and ribbon! They make great gift tags.

You Earned It!

The beautiful thing about education is that nobody can take it away from you! — B.B. King

Graduation season is quickly approaching. This is the time of year where you get celebrate the graduate in your life. Whatever the degree, it’s a huge pat on the back to them for staying committed to their goal. Looking back on my own college career, it was one of the most stressful times in my life. It was a constant juggling act of parenting, work, school, and maintaining my sanity. Thank God, I had a great support system because I was always two seconds away from quitting. A piece of advice that helped get me through was that, “it is only a moment in time.”

Decorating your graduation caps is a fun way to showcase or sum your journey. You get to make it unique to your experience or he respective grad. Plus it’s a great way for family to spot you on the graduation floor. For this graduate, I started with a quote and let the creativity flow from there.

Things You Need:

  • Ruler
  • Scissors
  • Acrylic Paint
  • Cardstock
  • Tacky Glue
  • Gems
  • Scrapbook Stickers(optional)

Step One: Prep Work

Start by cutting your card stock the same size of the graduation cap. Working on card stock is a great way to decorate without it being permanent. Remember to mark the button on the cap.

Step Two: Paint the background

I wanted to incorporate the school’s colors in to the cap, so I went with an
ombré of the two colors. To achieve an ombré effect start by painting the two colors (color #1-navy; color #2-orange)on the opposite ends. To blend the colors in the center add a small amount of color #2 (orange) to color #1 (navy) on the card stock. Use horizontal strokes and begin blending back and forth into color #2 (orange). Continue until the lines are no longer noticeable. Don’t forget to paint the small circle that will cover the button on the graduation cap.

Step Three: Glue Quote

Use a Cricut or scrapbook stickers to embellish the cap to your liking. Spray glue is great to use when you are working with delicate materials. Use tweezers to place the embellishments onto the cap.

Step Four: Secure Card Stock to Cap

Use an exacto knife to remove the center button guide. Put tacky glue on the top of the graduation cap and and press the card stock firmly down onto the cap.

Step Five: Add Gems

Use tacky glue to add gems to the card stock.

Allow graduation cap to dry overnight and add more gems if needed.

You are now ready to take your walk across the stage! Markia, congratulations on a job well done! To all the other graduates, this is your season of celebration. Enjoy it!